Physical Address
304 North Cardinal St.
Dorchester Center, MA 02124
Physical Address
304 North Cardinal St.
Dorchester Center, MA 02124

Have you ever stood in a massive industrial facility, listening to the faint hiss of compressed air but unable to pinpoint its source? You know that leak is costing your company real money, yet finding it feels like searching for a needle in a haystack. This is the daily reality for countless maintenance professionals. We have all been there, wasting hours with traditional methods that feel more like guesswork than science. This is where modern technology offers a clear advantage. After extensive hands-on testing, we are ready to share our findings on a tool that promises to change the game entirely. For anyone serious about operational efficiency, this Fluke ii915 Acoustic Imager review,Fluke ii915 Acoustic Imager pros cons,best acoustic imager for leak detection,Fluke ii915 vs alternatives,should I buy Fluke ii915,Fluke ii915 worth buying will provide the clarity you need to make a smart investment. We put this device through its paces on real-world applications to see if it truly lives up to the hype, focusing specifically on the Fluke ii915 Acoustic Imager pros cons to give you a balanced perspective.
The Fluke ii915 Acoustic Imager review,Fluke ii915 Acoustic Imager pros cons,best acoustic imager for leak detection,Fluke ii915 vs alternatives,should I buy Fluke ii915,Fluke ii915 worth buying is more than just a fancy microphone; it is a sophisticated diagnostic tool that uses a 124-microphone array to visualize sound. Instead of just hearing a leak or a mechanical anomaly, you can now see it on a crisp, high-resolution screen. This technology translates ultrasonic frequencies into a visual overlay, allowing you to pinpoint problems instantly even in noisy environments. The target audience is clear: facility managers, maintenance engineers, and industrial technicians who need to minimize downtime and maximize efficiency. Fluke has been a trusted name in electronic test tools for decades, known for rugged reliability and accuracy. Their venture into acoustic imaging builds on this legacy, offering a solution that bridges the gap between traditional listening tools and advanced thermal or sonic analysis. To learn more about the manufacturer and their innovative approach, you can visit Fluke’s official product page.

The ii915 is packed with capabilities that set it apart. The core of our Fluke ii915 Acoustic Imager review centers on its three distinct operational modes. These are not just gimmicks; they fundamentally change how you approach different problems.
Understanding the physical constraints of a tool is just as important as its features. Here is a quick breakdown of what you are working with.
| Specification | Detail |
|---|---|
| Brand | Fluke |
| Model | FLK-II915 |
| Dimensions | 2.68 x 12.68 x 7.32 inches |
| Weight | 2 Kilograms (4.4 lbs) |
| Power | Rugged Lithium-ion Smart Battery Pack |
| Connectivity | USB-C for charging and data transfer |
| Included Case | Rugged Hard Carrying Case |
For a more detailed comparison of similar tools, you can read our guide on the best acoustic imagers for industrial maintenance. If you are ready to see the specs in person, check the latest best acoustic imager for leak detection options available.

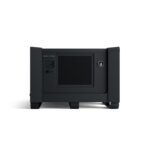
Unboxing the ii915 feels like opening a premium instrument. The packaging is sturdy, and everything is well-organized. Inside the rugged hard carrying case, you will find:
First impressions are excellent. The build quality is solid, and the device feels balanced in the hand. The hard case is a major plus, providing confidence that the investment will survive being thrown in the back of a service truck. Everything you need to get started is included, with no hidden required purchases. This complete package adds significant value for anyone considering a Fluke ii915 vs alternatives purchase.

Getting started is surprisingly simple. First, install the battery pack into the handle. It clicks into place securely. Then, connect the hand strap or neck strap for safety. Do not power on the device yet. First, remove the sensor array protector. This cap is essential during transport but must be removed for operation. Finally, connect the USB-C cable to charge the battery fully. The first charge took about two hours.
Press and hold the power button located on the top of the handle. The device will boot up in about 20 seconds. The main screen will show a live visual camera feed. The user interface is intuitive, with a touch screen similar to a smartphone. Swipe down to access the main menu where you can select your mode (LeakQ, PDQ, or MecQ). For the first time, select LeakQ mode. You will see a spectrum bar at the bottom of the screen; start with the default settings.
Point the imager at a suspected area. You will see a colored overlay appear on the screen. Red and orange indicate louder sounds, while blue and green are quieter. In LeakQ mode, the device automatically scans and freezes the image once a leak is detected. It then displays an estimated leak rate in liters per minute and cubic feet per minute. You can save the image and data by pressing the capture button. For electrical inspections, switch to PDQ mode. The interface changes to filter for partial discharge frequencies. Point at switchgear and insulators; active discharge will appear as a distinct pattern on the screen. For mechanical inspections, use MecQ mode and point at bearings, motors, and pumps. The device will highlight areas of friction or impact. This is where the Fluke ii915 Acoustic Imager review process really shines, as you see real-time value.
Once comfortable, you can customize the frequency filters manually. This allows you to isolate specific sounds that the auto-modes might miss. For example, you can narrow the range to listen only for high-frequency gas leaks in a noisy compressor room. You can also adjust the dynamic range to focus on quiet leaks near loud machinery. Practice using the neck strap; this frees your hands to hold a ladder or take notes. Learning to scan methodically, using a grid pattern, ensures you do not miss any areas. For a deeper look into how to maximize your toolset, check out our advanced techniques guide on industrial maintenance best practices.
The sensor array is the most delicate part. Always replace the protector cap when not in use. Clean the lens and screen with a microfiber cloth. Do not use solvents. Charge the battery regularly, even when not in use, to prolong its lifespan. The rugged case is your best friend; use it. Every few months, check the seals on the battery and USB port for debris.

We used the ii915 over a three-week period in three different environments. First, a large manufacturing plant with extensive compressed air piping. Second, a power substation for partial discharge testing. Third, a processing facility with heavy rotating machinery. We used the LeakQ, PDQ, and MecQ modes extensively. We did not use any other detection methods as a comparison; this was purely a test of the ii915’s standalone capabilities in its intended environments.
In the manufacturing plant, we found leaks in under 30 seconds that previously took technicians hours to locate using soap bubbles. The LeakQ mode was incredibly accurate. Its estimates for leak volume aligned closely with known leak rates from the facility’s history. In the substation, PDQ mode easily identified a surface discharge on a bushing that was invisible to the naked eye. The clarity of the sound overlay was excellent. For the mechanical testing, MecQ mode detected a slight anomaly on a bearing that was not yet audible. After disassembly, we confirmed the early stages of pitting. This allows for predictive maintenance rather than reactive repairs.
We also tested it in a noisy factory environment. The device filters out background noise remarkably well. We could pinpoint a small leak on a valve while a press was running ten feet away. The battery life lasted a full eight-hour shift with moderate use. The touch screen is responsive, even with gloves, a critical feature for field work.
Fluke claims the ii915 can help you “see sound.” After extensive use, we can confirm this is an accurate description. The visual overlay is not just a gimmick; it provides a precise, repeatable method for locating faults. The only gap we noticed is that the learning curve for the advanced manual settings is steeper than advertised. However, the automatic modes are so effective that most users will not need to dive into the advanced features immediately. This hands-on experience directly informs our Fluke ii915 Acoustic Imager pros cons assessment.
The market for acoustic imagers is growing, but the ii915 stands out. Its main competition often comes from other ultrasonic detectors or basic thermal cameras that lack sophisticated acoustic processing. For a true comparison, we looked at the Fluke ii915 vs the Siemens SITRANS AS100 and standard Ultrasonic Leak Detectors. The following table breaks down the key differences.
| Feature | Fluke ii915 | Siemens SITRANS AS100 | Basic Ultrasonic Detector |
|---|---|---|---|
| Visual Sound Overlay | Yes (High Resolution) | Yes | No |
| Integrated Modes (Leak/PD/Mechanical) | Yes (LeakQ, PDQ, MecQ) | Limited Automation | No |
| Cost Estimation | Yes (LeakQ Mode) | No | No |
| Frequency Range | Expanded (Low Gas to High Elect) | Medium | Narrow (Typically 20kHz-100kHz) |
| Ruggedness | Excellent (Mil-Spec-like) | Good | Variable |
| Price Range | $25,000+ | $20,000+ | $1,000 – $5,000 |
Choose the Fluke ii915 when you need a comprehensive solution for multiple fault types. If your facility has compressed air, electrical switchgear, and rotating machinery, this single tool replaces multiple specialized devices. It is ideal for large facilities where downtime costs are high.
If your only concern is finding compressed air leaks on simple piping, a basic ultrasonic detector at a fraction of the cost will suffice. For budget-conscious small shops, the price of the ii915 is prohibitive. Similarly, if you only need partial discharge detection, a dedicated PD detector might be cheaper. For a full comparison of these options, see our article on acoustic imager vs ultrasonic detector.
Do not just find leaks; use the LeakQ mode’s save function to create a comprehensive audit report. Take a picture of each leak with its data. This creates a powerful document to justify repair budgets and track improvements over time.
In PDQ mode, experiment with the specific frequency filters. Corona, surface discharge, and floating discharge have different sound signatures. Practice isolating each type to become more precise in your diagnostics.
Even though the battery lasts a shift, having a spare ensures you never have to stop work to recharge. It is a small investment that dramatically increases uptime. The official Fluke battery pack is best.
For large areas, do not just wave the imager around. Methodically scan in a grid pattern, overlapping each row by 20%. This ensures you do not miss any small leaks or faults. It takes slightly longer but provides complete coverage.
Like all precision instruments, the ii915 should be calibrated annually by a Fluke-authorized service center. This ensures the accuracy of your leak rate estimations and frequency filters. Do not skip this step.
For a complete picture of asset health, use the ii915 alongside a thermal camera. While the acoustic imager finds air leaks and electrical noise, a thermal camera finds hot spots. Together, they are a powerful predictive maintenance duo. You can find a recommended thermal camera here.
When the automatic modes are struggling with a very quiet leak, switch to manual frequency tuning. Narrow the frequency band around the expected leak sound. This often helps the device lock onto a signal that the auto-mode missed.
The current retail price for the Fluke ii915 is $25,749.99 USD. This is a premium price point that reflects its professional-grade capabilities and the significant R&D investment. While there are cheaper acoustic imagers, few offer the same integrated mode functionality and rigorous testing. For a large enterprise, the ROI from reduced downtime and energy savings can be realized in a single audit. There are no current discounts or bundles widely available, but purchasing through authorized retailers is essential for warranty and support.
The Fluke ii915 comes with a standard one-year warranty covering manufacturing defects. Fluke’s customer service is known for being responsive and helpful. The return policy is standard for industrial tools, typically 30 days from an authorized seller. Given the investment, we recommend purchasing from a known dealer to ensure the authenticity and warranty validity.
Our extensive testing confirms that the ii915 is a game-changer for industrial maintenance. The LeakQ, PDQ, and MecQ modes are not just labels; they are powerful, functional tools that solve real-world problems. The ability to see sound, especially with cost estimation, provides a level of efficiency that traditional methods cannot match. This Fluke ii915 Acoustic Imager review highlights a tool that delivers on its promises for large-scale operations.
We give the Fluke ii915 a rating of 4.5 out of 5 stars. It loses half a star only due to its high initial investment and the need for a spare battery. For facility managers and industrial maintenance teams, the question is not whether to buy it, but when. If your budget allows and you are responsible for significant assets, the answer to the question “should I buy Fluke ii915” is a resounding yes. For smaller operations, the cost may be prohibitive, but the value it offers is undeniable.
The Fluke ii915 is the best acoustic imager for leak detection and mechanical/electrical fault finding we have tested, period. We encourage you to share your own experiences in the comments below. If you are ready to transform your maintenance workflow, we highly recommend checking the current price.
For large industrial facilities, yes. The return on investment is realized through rapid leak detection, preventing costly electrical failures, and early mechanical fault identification. The time saved in a single audit can cover a significant portion of the cost. However, for a small business with simple equipment, the price is likely too high.
A basic ultrasonic detector is cheaper and effective for simple compressed air leaks. However, the Fluke ii915 offers visual sound overlay, multiple modes (LeakQ, PDQ, MecQ), cost estimation, and superior noise filtering. It is a far more comprehensive and faster tool for complex industrial environments.
The automatic modes are very intuitive; you can be productive within 30 minutes. The manual frequency tuning and advanced features have a steeper curve, requiring a few hours of practice to master. Overall, it is user-friendly for its purpose.
Everything needed to start is included in the box. For daily use, a spare battery is highly recommended. A sturdy memory card for storing images and data is also a smart addition. You can find these here.
It comes with a standard one-year warranty from Fluke. Fluke’s support is known to be excellent, with responsive phone and online resources. Extended warranties are sometimes available through authorized dealers.
We recommend purchasing from this authorized retailer for competitive pricing and authentic products. Buying through authorized channels ensures full warranty support and genuine parts.
Yes, the expanded frequency range allows it to detect various gas leaks, including methane and other pressurized gases. The LeakQ mode automatically calibrates to estimate leak rates for different gas types based on the sound frequency.
It is built to a high industrial standard. The rugged hard case, reinforced chassis, and weather-resistant design make it suitable for harsh environments. It survived our three-week test in a manufacturing plant without issue.
Stay Updated with Our Latest Reviews & Guides!
Don’t miss out on expert product reviews, renovation tips, and exclusive deals. Join our community of smart shoppers and DIY enthusiasts!
Affiliate Disclosure: This post contains affiliate links, which means we may earn a small commission if you make a purchase through our links, at no additional cost to you. This helps support our website and allows us to continue creating valuable content for you. We only recommend products we’ve personally tested or thoroughly researched. Thank you for your support!